
You didn’t need me to tell you that, though. Right? It goes without saying, as it’s right in the name. Secret Key. You give people the other half, the Public Key. I think they teach that in kindergarten these days.
So, why am writing a post about such a simple topic? Let me tell you a story…
I’ve been using keybase.io for years.
I probably haven’t been using all its features, but it serves as another way of verifying some ways of communicating securely with me.
keybase.io was bought by Zoom, and we don’t know what that means yet. Will it stay free? Will it get shut down because all Zoom cared about was the crypto skills and tech?
One thing that is happening is that at least one ‘competitor’ has already popped up. Yesterday I received an invite from Cyph to sign up. They’d conveniently scraped my public info at keybase.io and populated an account that was ready for me if I accepted the invite. All I had to do was click the link and provide a new password and PIN. What the heck, I’ll sign up and make sure I get the name Ghostwheel before Scott in Atlanta grabs it.
There’s a reason I put ‘competitor’ in quotes is because there is something very phishy about Cyph. The website at cyph.app wants me to prove I own the pgp public key they scraped from keybase.io by… uploading my private key to their servers.
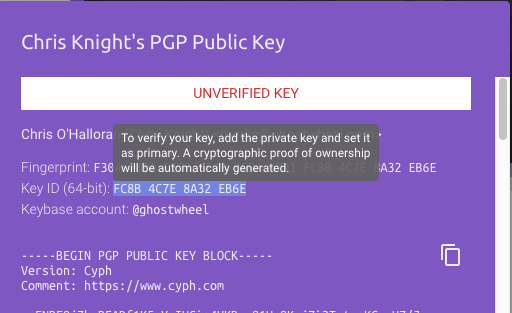
That. is. not. going. to. happen.
That’s now how it works. That’s not how any of this works!
You want me to prove I own the secret key? Give me a random blob of text to sign, and you verify it with my public key.
You want to compromise any pgp/gnupg encrypted communications I have ever had? Yeah, that’s when you ask for my secret key.
Now that I’m taking another look at the invitation email, it isn’t even properly signed. It has a signed.asc but it’s malformed. Looking more phishy by the minute.
We’re supposed to move from keybase.io to a website that wants us to add our secret keys to their keystore, and where the CEO can’t send a properly pgp signed email?
Yeah, nah.